Repairing a FileVault-protected Home folder

This FAQ applies to Mac® OS X® 10.3 or later. It addresses repairing FileVault®-protected Home folders that were encrypted with FileVault under Mac OS X 10.3-10.6, aka Legacy FileVault.

This FAQ specifically applies in the following situations:

  • You are running Mac OS X 10.3-10.6 and have encrypted one or more Home folders with FileVault.
  • You are running OS X 10.7 or later and upgraded without first disabling FileVault protection on Home folders encrypted with FileVault under Mac OS X 10.6 or earlier.

This FAQ does not apply to FileVault 2, i.e. FileVault disk encryption as implemented in OS X 10.7 and later. FileVault 2 encrypts the entire startup disk, not individual Home folders. If you upgraded to OS X 10.7 or later without first disabling FileVault encryption on Home folders encrypted under Mac OS X 10.3-10.6, those Home folders remain encypted with the earlier version of FileVault and you cannot enabled FileVault 2. Note that Apple® documentation for OS X 10.7 and later — such as Help information — refers to FileVault 2 as FileVault and refers to FileVault in Mac OS X 10.6 and earlier as Legacy FileVault.

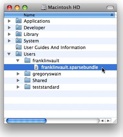
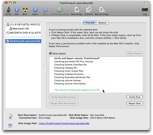
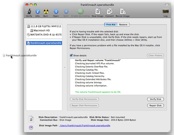
FileVault-protected Home folders are encrypted disk images. Under Mac OS X 10.3 and 10.4, the disk image is in sparse image format. Under Mac OS X 10.5 and 10.6, the disk image is in sparse bundle format.

File system directory corruption can occur in any of these disk image formats. This is usually as the result of an improper shutdown, such as a power outage or using the power button to shut down the computer after a freeze or kernel panic. The following problems with a FileVault-protected account usually indicate that its disk image may be corrupted:

  • Inability to log in.
  • After logging in, the account appears to have been reset to a new account: the desktop and Dock are set to default values and all personal data is missing.
  • Inability to disable FileVault, despite having the necessary free disk space.

Repairing the disk image that represents a FileVault-protected Home folder depends on the version of Mac OS X used to encrypt the Home folder:

Repairing a FileVault-protected Home folder under Mac OS X 10.5 or later

Warning: This procedure involves using the root user. While root should not to be feared, it must be used with caution: mistakes made while logged in as root may be irreversible.

You will need…

  1. An Admin account on the Mac in question.
  2. The Master Password for the Mac in question.
  3. The following AppleCare Knowledge Base documents:
    1. "Enabling and using the 'root' user in Mac OS X."
    2. Note: This document also addresses disabling the root user.
    3. "Mac OS X: Starting up in Safe Mode."

Procedure

1. Log in to an Admin account.
2. Enable the root user. Write down the password assigned to root.
3. Log out of the Admin account.
4. Restart the Mac in Safe Mode.
5. Log in as root:
5.1. At the Login window, click Other….
5.2. In Name, type: root
5.3. In Password, type the password specified for the root user in step 2.
5.4. Click Log In.
6.

Open the Macintosh HD > Users > username folder, where username is the short name of the affected account.

Note the username.sparsebundle file therein. This is the user's FileVault-protected Home folder.

In the sample screen shot at right, the affected account's short name is franklinvault and the corresponding sparse bundle disk image is franklinvault.sparsebundle.

7. Open Disk Utility, located in the Macintosh HD > Applications > Utilities folder.
8. Drag the username.sparsebundle file from the Finder window opened in step 6 to the left pane of the Disk Utility window.

This step does not move the sparse bundle: it simply makes the disk image available for verification or repair by Disk Utility.

9. Select the username.sparsebundle file in the left pane of the Disk Utility window, then click Repair Disk.
10. Type the Master Password when prompted.

Disk Utility will verify the directory of the sparse bundle and attempt to repair problems, if any.

11. Determine if Disk Utility repaired the sparse bundle:
If Repair Disk completes with the message: Then:

The volume username appears to be OK.

No problems were found.

See screen shot at right.

The volume username has been repaired. Problems were found and corrected. You may wish to click Verify Disk to confirm this.
None of the above. The sparse bundle could not be repaired: see "Disk Utility cannot repair the sparse bundle" below.
12. Drag the username.sparsebundle disk image from the left pane Disk Utility to the desktop. It will disappear in a puff of smoke.

This step does not delete the sparse bundle: it merely cleans up the left pane of Disk Utility.

13. Log out of root.
14. Log in to an Admin account.
15. Disable the root user.
16. Restart the Mac.
17. Attempt to log in to the affected account.

Disk Utility cannot repair the sparse bundle

If you have installed a Leopard-compatible version of a third-party disk utility, such as Alsoft® DiskWarrior® or Micromat® TechTool® Pro, you may still be able to repair the sparse bundle. This hinges on whether or not the sparse bundle can be mounted. To attempt to mount the affected sparse bundle:
Warning: Only use Leopard-compatible versions of disk utilities on disks used with Leopard.

1. Double-click the affected sparse bundle.
2. Type the Master Password when prompted.
3. Determine if the sparse bundle mounts:
If the sparse bundle: Then:
Mounts Attempt to repair the mounted disk image using the third-party disk utility.

If the third-party disk utility cannot repair the mounted sparse, then data in the affected user's Home folder is unrecoverable and must be restored to a new account from a recent backup, if available.

Does not mount The sparse bundle cannot be repaired: data in the affected user's Home folder is unrecoverable and must be restored to a new account from a recent backup, if available.
Did you find this FAQ helpful? You will find a wealth of additional advice for preventing or resolving Mac OS X problems in Dr. Smoke's book, Troubleshooting Mac® OS X.
Use of this site signifies your agreement to the terms of use.