This FAQ discusses a procedure for uninstalling or removing Mac® OS 9. It covers two scenarios:
If Mac OS 9 is installed on the same partition as Mac OS X — the standard configuration for Macs that shipped with Mac OS X installed prior to July 2004 — perform following tasks:
| 1. |
Optional: Back up your system. This should be straightforward if you have implemented the comprehensive backup and recovery solution. |
|
In particular, you may want to create a Backup Set of your Mac OS 9 System Folder in the event you wish to reinstall Mac OS 9. |
| 2. |
Start up the Mac in Safe Mode. |
| 3. |
For each account defined on the Mac, perform the following steps to assure that the removal of Mac OS 9 will not result in any subsequent problems when users log in to their accounts. |
|
3.1. |
Login to an account. |
|
3.2. |
Open System Preferences and click Classic. |
|
3.3. |
Click the Start/Stop tab. |
|
3.4. |
If Start Classic when you login is selected, deselect it. |
|
3.5. |
Click Show All. System Preferences displays all available preference panes. |
|
3.6. |
Remove [-] Login Items that launch Classic or Mac OS 9 applications. How this is done varies by Mac OS X version; refer to the following AppleCare Knowledge Base documents:
|
|
3.7. |
Quit (Command-Q) System Preferences. |
|
3.8. |
In Finder™, open the account’s Home > Library > Preferences > ByHost folder. |
|
3.9. |
If the ByHost folder contains the file com.apple.Classic.xxx.plist — where xxx is an alphanumeric string — drag that file to the Trash.
This file tells Mac OS X the location of the Mac OS 9 System Folder used for Classic. It is created by selecting a Mac OS 9 System Folder in the Start/Stop tab of Classic preferences.
|
|
3.10. |
Empty the Trash. |
|
3.11. |
Log out of the account. |
| 4. |
Log in to your Admin account. |
| 5. |
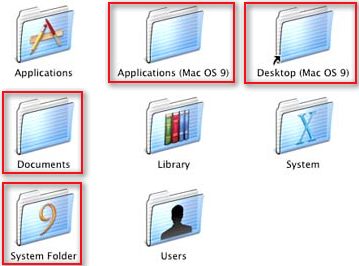
In Finder, open your Mac OS X startup disk, e.g. Macintosh HD.
We will now work with the four folders highlighted in red rectangles in the following screen shot:
|
|
|
 |
|
5.1. |
Drag the following folders to the Trash:
- System Folder. This folder bears the stylized 9 logo of Mac OS 9.
- Applications (Mac OS 9). Note that this will uninstall all Mac OS 9 applications.
- There may be additional folders specific to Mac OS 9 applications you will no longer be able to use. These are related to applications you installed before the advent of the Applications folder in Mac OS 9.1 if you installed Mac OS X over Mac OS 9. If any such folders exist, trash them.
If prompted to Authenticate, type your Admin password.
|
|
5.2. |
Open the Desktop (Mac OS 9) alias. Move (Command-drag) any documents from this folder that you created and that you want to save to your Home > Documents folder. Trash anything else in this folder.
The Desktop (Mac OS 9) alias is a symbolic link to the Desktop Folder directory (/Desktop Folder), which is the Mac OS 9 desktop. This directory is usually hidden. In Mac OS X 10.2 and later, if the Desktop Folder directory contains files, i.e. if there are files on the Mac OS 9 desktop, then the Desktop (Mac OS 9) alias is created automatically when you start up your Mac. This is to permit one to access the Mac OS 9 desktop from Mac OS X. If the Desktop Folder directory is empty, then the Desktop (Mac OS 9) folder alias is not created. After emptying the folder to which the Desktop (Mac OS 9) alias points and restarting at the end of this procedure, the Desktop (Mac OS 9) alias should no longer appear.
|
|
5.3. |
Open the Documents folder, if extant. Move any documents from this folder that you want to save to your Home > Documents folder. |
|
5.4. |
Move the Documents folder to the Trash. |
| 6. |
Empty the Trash. If you have any difficulties emptying the Trash, see the "Solving Trash problems" FAQ. |
| 7. |
If you have set any Carbonized applications to open in Classic mode, reset these to open in Mac OS X by opening the Get Info window of the application and deselecting Open in the Classic Environment. |
| 8. |
Restart the Mac. |
If desired, make a backup of the partition where Mac OS 9 is installed in case you may need something from it in the future. Then perform steps 2, 3, 5.2, 6, and 7 of the procedure above before you erase the partition on which Mac OS 9 is installed.