|
Taming secure.log under Panther
The secure.log file logs security-related messages in Mac® OS X, including failed login attempts and messages from the SecurityServer process. This log is not pruned by the maintenance scripts under Mac OS X 10.3 Panther®, meaning it can grow without limit.
This FAQ provides guidance on the following topics regarding secure.log under Panther:
Examining secure.log
On our test systems, the largest secure.log file is 1.4Mb, with entries dating back to October 2003. We regard a secure.log file of this size, or even several Mb larger, to be completely acceptable.
If your secure.log file has grown to several gigabytes (Gb) in size, then you should consider examining it to determine the cause. Unfortunately, it cannot be read in Console, even by an Admin user: only root can open it.
However, the following workarounds will enable you to examine secure.log:
- If you have enabled the root user on your Mac, you can log in as root and examine the file in Console.
- Note: Only enable and use the root user if your are skilled in UNIX®.
- Use the freeware application Check Failed Password Attempts to see if the problem is related to failed password attempts, which could indicate someone is attempting to hack into your Mac. However, this will not uncover other potential causes of a runaway secure.log file, such as background processes writing messages to this file.
- Using your Admin account, copy the secure.log file to your desktop, then open the copy in either Console or TextEdit:
- In Finder™ select Go > Go to Folder...
- In the resulting sheet, type /private/var/log/ in the entry field.
- Click Go. The Finder window now displays the contents of the /private/var/log/ directory.
- Locate secure.log in the Finder window.
- Copy (Option-drag) this file to your desktop, authenticating with your Admin password when prompted.
- Since you are the Owner of the copy, double-clicking the copy will enable you to read it in Console.
When examining secure.log, look for extraordinary messages, such as invalid login attempts or repeating messages, especially from applications that you do not recognize.
If you do not have enough available (free) disk space to copy the file to your desktop, see our "Freeing space on your Mac OS X startup disk" FAQ for advice on freeing space on your startup disk.
Trashing secure.log
To trash secure.log and free the disk space it occupies, use your Admin account to perform the following steps in the order specified:
- In Finder select Go > Go to Folder...
- In the resulting sheet, type /private/var/log in the entry field.
- Click Go.
- In the resulting Finder window, locate and trash the secure.log file.
- Authenticate by typing your Admin password when prompted.
- Restart your Mac.
- Log in to your Admin account.
- Empty the Trash.
- Use one of the procedures defined below to recreate secure.log.
Recreating secure.log
The secure.log file will not be recreated automatically. You want this file since it logs potential security problems. We provide instructions here for two methods of recreating the secure log:
Recreating secure.log via Terminal
Type each of the following commands, exactly as written, at the Terminal prompt. After typing a command, press Return. Type your Admin password whenever prompted for a password.
- Change the current directory to /private/var/log/:
- cd /private/var/log/
- Create a new secure.log file in the /private/var/log/ directory:
- sudo touch secure.log
- Set the Group of the new secure.log file to admin:
- sudo chgrp admin secure.log
- Set the Owner of the new secure.log file to root:
- sudo chown root secure.log
- Assure system has Read and Write permissions on the new secure.log file:
- sudo chmod u=rw- secure.log
- Assure Group and Others have no access to the new secure.log file:
- sudo chmod go-rwx secure.log
- Check your work:
- sudo ls -l secure.log
- You should see the following output, with the exception of the date and time noted in this example:
- -rw------- 1 root admin 0 2 Apr 15:25 secure.log
- Restart your Mac.
New security-related messages will now be logged in the new secure.log file. You can check this by examining the size of the secure.log file in the /private/var/log/ directory and that it was updated when you restarted your Mac.
Recreating secure.log with TextEdit and Finder
To recreate secure.log in the /private/var/log/ directory using TextEdit and Finder, perform the following steps using your Admin account.
- If you followed our earlier instructions to copy secure.log to your desktop, do one of the following:
- If you want to save the copy of secure.log for further analysis, rename it to, for example, my-copy-of-secure.log.
- If you are done with your analysis, trash the copy of secure.log on your desktop, then empty the Trash.
- Launch TextEdit. A new, untitled file should open.
- Select Format > Make Plain Text if you have TextEdit set to create Rich Text files by default. The default format for new files is specified in TextEdit > Preferences.
- Save (Command-S) this new, empty, plaint-text file.
- In the resulting Save sheet:
- If the Hide Extension checkbox is checked at the bottom of the sheet, uncheck it.
- Overtype Untitled.txt in the Save As field with secure.log
- Select Desktop as the location to save the file.
- Click Save.
- The following alert dialog will appear:
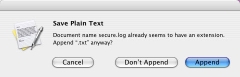
- Click Don't Append. The secure.log file should now be saved on your desktop.
- Quit TextEdit.
- Open the /private/var/log/ directory:
- In Finder select Go > Go to Folder...
- In the resulting sheet, type /private/var/log/ in the entry field.
- Click Go.
- Move (Command-drag) the new, empty secure.log file from your desktop into the Finder window opened in step 7.
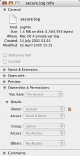
- Open the Get Info window (Command-I) of the secure.log file moved in step 8.
- In the Get Info window, open the Ownership and Permissions panel, then click the disclosure triangle to open the Details section therein.
- Click the lock icon next to Owner in the Details section.
- Change permissions in the following order, typing your Admin password when required to authenticate:
- Set Group to admin and set Access to No Access for Group.
- Set Others to No Access.
- Set Owner to system and Access for Owner to Read & Write.
- Note that the Get Info window indicates that you now have No Access to this file, as seen in the following screen shot.
- Close the Get Info window.
- Restart your Mac.
New security-related messages will now be logged in the new secure.log file. You can check this by examining the size of the secure.log file in the /private/var/log/ directory and that it was updated when you restarted your Mac.
Related links
|
|
|
|