|
||||||
 |
||||||
|
||||||
|
|
||||||
Troubleshooting a failed indexing operationNote: This FAQ applies to Mac® OS X 10.2 Jaguar and Mac OS X 10.3 Panther®. If you are using Mac OS X 10.4 Tiger®, see the "Rebuilding Spotlight indices" section of our "Spotlight tips" FAQ. This FAQ is a subset of the comprehensive information in the "Find by Content" chapter of our book Troubleshooting Mac OS X, Second Edition. It addresses the process by which one can identify and resolve a failed index build under Jaguar or Panther. Indexing is required to use Find by Content. For additional information concerning Find by Content, including how to create indices and recommendations for indexing that minimize problems such as that addressed in this FAQ, see the "Find by Content" chapter of our book Troubleshooting Mac® OS X, Second Edition. Components of an index under Jaguar and PantherAn index consists of the following files:
When you index a disk, volume, or folder all included subfolders are also indexed. This results in the three files named above being created in every folder and subfolder contained within the disk, volume, or folder you selected for indexing. For example, if you index an entire disk or volume containing thousands of folders and subfolders, thousands of the index files noted above will also be created, one set of three per folder. Depending on the contents of the folder being indexed, these index files can be infinitesimally small or very large. At their largest, they will be about ten percent of the size of the folder indexed. Why indexing can failIndexing can fail if:
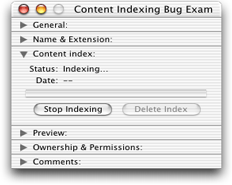
Identifying a failed indexing operationIf indexing fails, no error messages are displayed. The only indications that indexing failed are:
CauseOne or more files contained in the disk, volume, or folder on which indexing failed are either corrupted or failed text extraction. [2] SolutionResolving the failed indexing operation is a two-step process:
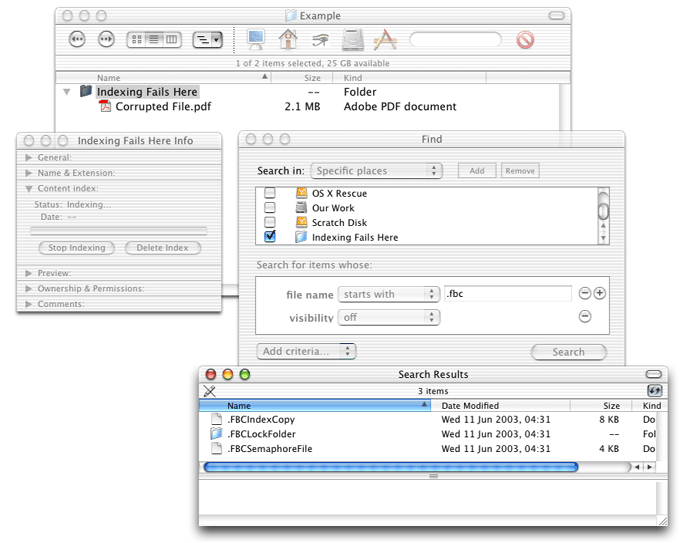
1. Delete the failed indexIf you have indexed only a single folder, without subfolders, this process will be straightforward as the folder containing the failed index is the folder you indexed. If you indexed a disk, volume, or folder containing multiple subfolders, you will need to check the subfolders individually to find the folder in which indexing failed. Unless a folder exhibits the features shown in the last screen shot, you will have to attempt to index each subfolder individually until you find the folder where indexing fails. Note that if indexing fails on a subfolder of a folder, both the folder and its subfolder will exhibit the symptoms of a failed index discussed above. Once you have identified the folder on which indexing failed, do the following:
2. Find and remove the corrupted filesThere are several approaches to finding corrupted files that may be preventing indexing from completing successfully.
Related LinksNotes[1] You can determine if the ContentIndexing process is running by opening Activity Monitor (Panther) or Process Viewer (Jaguar) and looking for the ContentIndexing process in the Name column. See the AppleCare® Knowledge Base document “Mac OS X: How to Find Background Applications.” [2] Unfortunately, the ContentIndexing.crash.log file provides little or no information to help pinpoint the corrupted file or files on which indexing failed. You may get some indication if the corrupted file is a PDF- or HTML-type file based on the processes running in the specific thread that crashed. You may ultimately find that the file which caused indexing to fail is not corrupted, but was seen as such by the PDF or HTML text extractor plug-ins. For help reading and interpreting crash logs, see the “Console and Crash Logs” chapter of Troubleshooting Mac OS X. |
|
|||||||||||||||||||||||||||||||||||||||||||||||||
|
||||||||||||||||||||||||||||||||||||||||||||||||||