|
Resolving Disk, Permission, and Cache Corruption
A variety of Mac® OS X problems can be caused by corruption in any or all of the following three areas:
- The directory of your Mac OS X startup disk.
- Permissions on System files or folders.
- System, Application, or User-specific cache files.
This FAQ, derived from our book, Troubleshooting Mac OS X, will help you to address these issues under the following versions of Mac OS X:
- Mac OS X 10.6 Snow Leopard®
- Mac OS X 10.5 Leopard®
- Mac OS X 10.4 Tiger®.
- Mac OS X 10.3 Panther®.
- Mac OS X 10.2 Jaguar.
Potential causes
The following are potential causes of disk, permission, or cache corruption.
- System or application crashes.
- Hard restarts: restarting a frozen or hung system via the power button.
- Power outages.
- Bad sectors on your Mac OS X startup disk.
- Defective or failing hard drives.
- Application installers which have improperly reset System-related permissions.
Risk of data loss
Hard drive failures, bad sectors, and directory corruption are serious problems as these can result in data loss. If you value your data, you have implemented a comprehensive Backup and Recovery solution and use it regularly, preferably backing up everything on a daily basis. This practice should significantly minimize the potential for data loss to new data or changes to existing data since the last backup was performed.
While Disk Utility or third-party disk utilities can usually correct directory corruption, they cannot repair corrupted files. While directory corruption does not necessarily result in file corruption, certain types of directory corruption, such as overlapped files or extents, can result in file corruption and hence data loss.
Likewise, data saved on an area of the hard drive that develops bad sectors will be irretrievably corrupted and unrecoverable. While generally rare, bad sectors can develop on a hard drive at any time. For additional details, see the "Bad sectors" section later in this FAQ.
While Disk Utility and third-party disk utilities can be useful in helping to correct directory corruption or address bad sectors, you should consult the precautions cited in the section "Using disk utilities to correct hard drive problems" before employing any disk utility.
The potential for data loss, despite the excellent reliability of modern hard drives, is why it is critical to implement a comprehensive Backup and Recovery solution and use it regularly before you need it. No disk utility is a substitute for a good, current backup. While corrupted operating system files can be replaced by reinstalling Mac OS X, corrupted data files can only be salvaged by restoring uncorrupted copies from a backup.
Solution
You will need...
- The Mac OS X Install Disc corresponding to the version of Mac OS X you are using.
- If you installed Mac OS X using a retail package of the operating system, the disc should be labeled:
- Snow Leopard: Mac OS X Snow Leopard Install DVD.
- Leopard: Mac OS X Leopard Install DVD.
- Tiger: Mac OS X Tiger Install DVD.
- Panther: Mac OS X v10.3 Install Disc 1.
- Jaguar: Mac OS X v10.2 Install Disc 1.
- If the version of Mac OS X you are using is the version that came installed on your new Mac, use the disc labeled Mac OS X Install Disc 1. Older Macs may have a disc labeled Software Install and Restore disc — usually also marked as Disc 1 — that came with the computer.
- It is critical to use the Mac OS X Install Disc corresponding to the version of Mac OS X you are using. Do not use Install discs from others versions of Mac OS X.
- A cache-cleaning utility that is compatible with the version of Mac OS X you are using. Recommended utilities are the shareware applications Cocktail and Yasu. You can find additional solutions by searching MacUpdate or VersionTracker™.
- As with the Mac OS X Instal Disc, use the version of the utility that is compatible with the version of Mac OS X you are using.
Procedure
Review this procedure thoroughly before proceeding. Then perform Steps 1-4 in the order specified.
| 1. Check SMART Diagnostics |
| This step checks the Self-Monitoring, Analysis, and Reporting Technology (SMART) diagnostics of the hard drive containing your Mac OS X startup disk to assure the drive is working properly. |
| 1.1. |
Start up from your Mac OS X Install Disc: |
|
| 1.1.1. |
Insert your Mac OS X Install Disc into your Mac's optical drive. |
| 1.1.2. |
Restart your Mac using either of the following methods:
- Select Restart in the Apple® menu.
- Press the Command-Control-Eject keyboard combination.
|
| 1.1.3. |
Immediately press and hold the C key on your keyboard. |
| 1.1.4. |
Release the C key shortly after the Apple logo and spinning gear progress indicator appear on your display. |
|
| 1.2. |
Select your language when prompted. |
| 1.3. |
After the Installer window appears, open Disk Utility:
- Mac OS X 10.4 or later: Choose Utilities > Disk Utility in the menu bar.
- Mac OS X 10.3 or earlier: Choose Installer > Disk Utility in the menu bar.
|
| 1.4. |
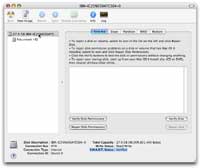
After the Disk Utility window opens, select the hard drive containing your Mac OS X startup disk from the list of drives and volumes in the left column of the Disk Utility window. For most users this will be the hard drive containing the volume Macintosh HD, denoted by the mouse pointer in the following screen shot: |
|
 |
| 1.5. |
At the bottom of the Disk Utility window, check the status reported in the S.M.A.R.T. Status field. This field is highlighted in blue in the previous screen shot.
Determine the status of your hard drive:
|
|
| If the S.M.A.R.T. Status is: |
Then the hard drive containing your Mac OS X startup disk is: |
|
Verified
|
Considered to be working properly. Proceed to Step 2, Repair Disk.
|
|
Other than Verified, such as About to Fail
|
Is not working properly. Proceed as follows:
- Quit (Command-Q) Disk Utility. Focus returns to the Installer.
- Quit (Command-Q) the Installer. When prompted, select Shut Down.
- Follow the advice in our "Data Recovery" FAQ to attempt to recover the data on your startup disk.
- Have the affected hard drive replaced.
|
|
|
2. Repair Disk
|
| This step will check for and usually repair directory corruption on your Mac OS X startup disk. |
| 2.1. |
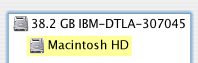
Select the volume corresponding to your Mac OS X startup disk from the list of drives and volumes in the left column of the Disk Utility window. For most users, this will be the volume Macintosh HD, as highlighted in the following screen shot. |
|
 |
| 2.2. |
Click the First Aid tab in the Disk Utility window. |
| 2.3. |
Click the Repair Disk button on the First Aid tab. The Repair Disk process is performed. Pay careful attention to the messages reported during this process. |
| 2.4. |
Determine if Disk Utility repaired the disk: |
|
| If Repair Disk completes with any of the messages: |
Then Disk Utility: |
|
No repairs were necessary.
The volume has been repaired.
|
Repaired the disk. Proceed as follows:
- Quit (Command-Q) Disk Utility. Focus returns to the Installer.
- Quit (Command-Q) the Installer. When prompted, select Restart.
- Proceed to Step 3, Repair Disk Permissions.
|
|
The volume Macintosh HD needs to be repaired.
Error: The underlying task reported failure on exit.
Error Code -9972.
Volume needs repair.
|
Failed to repair the disk. Proceed as follows:
- Write down the problems noted by Disk Utility, copying the exact text of the messages. These may be useful in troubleshooting the specific type of directory corruption affecting the disk in question.
- See the section "Disk Utility cannot repair the disk" later in this FAQ.
- Quit (Command-Q) Disk Utility. Focus returns to the Installer.
- Quit (Command-Q) the Installer. When prompted, select Shut Down.
- Do not proceed further until the errors found by Disk Utility have been corrected.
|
|
|
3. Repair Disk Permissions
|
| This step will assure that permissions are set correctly on Mac OS X System components. |
| 3.1. |
Log in to your Admin account.
|
| 3.2. |
Quit (Command-Q) any applications that opened automatically as specified in your account's Login Items (Leopard, Tiger, Jaguar) or Startup Items (Panther). |
| 3.3. |
Open Disk Utility, located in the Macintosh HD > Applications > Utilities folder. |
| 3.4. |
Select your Mac OS X startup disk. This is normally the volume Macintosh HD. |
| 3.5. |
Click the First Aid tab in the Disk Utility window. |
| 3.6. |
Click the Repair Disk Permissions button on the First Aid tab. The Repair Disk Permissions process is performed. |
| 3.7. |
Determine if Repair Disk Permissions completed successfully: |
|
| If Repair Disk Permissions completes with the message: |
Then Repair Disk Permissions: |
|
Permissions Repair Complete
The privileges have been verified or repaired on the selected volume
|
Completed successfully. Proceed as follows:
- Quit (Command-Q) Disk Utility.
- Proceed to Step 4, Perform cache cleaning.
|
|
Error: No valid packages (-9997)
|
Failed. Proceed as follows:
- Follow the advice in the AppleCare Knowledge Base document "Mac OS X 10.3, 10.4: Disk Utility shows a 'No Valid Packages' alert."
- Repeat Step 3, Repair Disk Permissions.
|
|
| 4. Perform cache cleaning |
| This step will clean potentially corrupted System and User cache files, which can cause a variety of problems in Mac OS X. |
| 4.1. |
Download and install one of the recommended cache cleaning utilities or your preferred alternative.
|
| 4.2. |
Thoroughly review the documentation for your cache-cleaning utility before using it. In particular, no other applications but the selected utility should be running when you invoke the cache cleaning function. See our "Side effects of System cache cleaning" FAQ for important information about cache cleaning. |
| 4.3. |
Perform a thorough cache cleaning — including both System and User caches — using your preferred utility. |
| 4.4. |
Restart your Mac if your cache cleaning utility does not do so automatically. |
Disk Utility cannot repair the disk
If the Repair Disk function of Disk Utility found directory corruption that it could not repair:
- If Disk Utility returns the message "Underlying task reported failure" or error code -9972, see the AppleCare Knowledge Base document "Disk Utility reports 'Underlying task reported failure' when repairing a volume."
- A third-party disk utility, such as Alsoft® DiskWarrior® or Micromat® TechTool® Pro may be able to correct the directory corruption that Repair Disk could not. Before using a third-party disk utility, consult the precautions cited in the "Using disk utilities to correct hard drive problems" section of this FAQ.
- If all efforts to repair directory corruption fail, see the section "Reinstall Mac OS X on a zeroed startup disk" below.
Bad sectors
Bad sectors are the result of problems with the magnetic media used to save data on a hard disk. While generally rare, bad sectors can develop at any time. Bad sectors usually reveal themselves by a repeating series of sounds that are heard during an attempt to read-from or write-to a disk. These sounds can be roughly characterized as:
- Chug, chug, chug, chug, pause.
- Grind, grind, grind, grind, pause.
The series will usually repeat multiple times until the system abandons the attempt to read-from or write-to the disk.
Bad sectors are bad news:
- Bad sectors can corrupt your personal data, operating system files, or space on which the directory of a disk, partition, or volume has been written. Data in bad sectors is generally considered irretrievably corrupted.
- If bad sectors develop on your startup disk and corrupt either operating system files or the startup disk's directory, your Mac will not start up.
- Bad sectors can be an early indication of a hard drive that will eventually need to be replaced.
If bad sectors are suspected, Micromat TechTool Pro includes a Surface Scan function that can identify and confirm bad sectors. If bad sectors — sometimes called bad blocks — are identified on your startup disk, then you must follow the procedure specified in "Reinstall Mac OS X on a zeroed startup disk."
Before using TechTool Pro — or any other third-party disk utility — consult the precautions cited in the "Using disk utilities to correct hard drive problems" section of this FAQ.
Reinstall Mac OS X on a zeroed startup disk
This section details the method for resolving either bad sectors or irreparable directory corruption on your startup disk. However, note that while this procedure may address bad sectors currently on the disk, additional bad sectors may develop in the future. Detailed instructions on reinstalling Mac OS X can also be found in our book Troubleshooting Mac OS X.
Otherwise:
| 1. |
Create a new backup of the affected Mac's startup disk using your comprehensive Backup and Recovery solution. If disk problems prohibit creating a new backup, attempt to recover data from the disk using the advice in our "Data Recovery" FAQ. |
| 2. |
Start up from your Mac OS X Install Disc and erase the Mac OS X startup disk using Disk Utility. Use the Security Options to Zero Out Data or Zero All Data, depending on the version of Mac OS X you are using.
- Detailed instructions for zeroing drives or volumes can also be found in the "Zeroing Volumes" chapter of our book Troubleshooting Mac OS X.
- Note that Disk Utility under Mac OS X 10.4 is the first version of Disk Utility that permits one to zero out data on a specific partition or volume if the affected hard drive has multiple partitions. The versions of Disk Utility included with Panther and Jaguar only permit one to zero out data on an entire disk.
- The process of erasing a disk, partition, or volume by writing zeros to every bit on such is called zeroing. Zeroing finds bad sectors and maps them out of service, also known as sparing. When an attempt to write zeros to bad sectors fails, the bad sectors are both marked as occupied in the directory and added to the bad blocks file of the file system. Once the bad sectors have been spared, no attempt will ever be made to read-from or write-to them again. For details, see Apple Developer Connection Technical Note TN1150, "HFS Plus Volume Format."
|
| 3. |
If you do not have a good, recent backup of the affected Mac's startup disk, skip to step 4. Otherwise: |
|
| 3.1. |
(Optional, recommended) Check the recent backup you plan to restore for corrupted files using the techniques described in our "Finding Corrupted Files" FAQ. If these techniques identify corrupted system-related files, proceed to step 5. |
| 3.2. |
Using your comprehensive Backup and Recovery solution, restore the affected Mac's startup disk, which you zeroed in step 2, from its most recent backup. |
| 3.3. |
From the backup or recovered data created in step 1, attempt to restore new or changed personal data files — not system-related files — that were created after the backup you restored in step 3.2. |
| 3.4. |
Skip to step 5. |
|
| 4. |
Since you do not have a good, recent backup of the affected Mac's startup disk, it must be rebuilt: |
|
| 4.1. |
Reinstall Mac OS X.
Note: If you are running Mac OS X 10.6, see the AppleCare Knowledge Base document "Mac OS X v10.6 Snow Leopard: How to Erase and Install."
|
| 4.2. |
Run Software Update to update Mac OS X and related Apple software to the version you were employing prior to step 2. |
| 4.3. |
Reinstall any bundled applications that came with your Mac. |
| 4.4. |
Run Software Update again to update any bundled applications to the version you were employing prior to step 2. |
| 4.5. |
Reinstall your third-party applications. |
| 4.6. |
Install any required updates to your third-party applications. |
| 4.7. |
Repair Disk Permissions as noted earlier in this FAQ. |
| 4.8. |
Restore your personal data files — not system-related files — from either the backup or the recovered data created in step 1. |
|
| 5. |
Test the rebuilt startup disk, checking both applications and data, particularly any data you restored in steps 3.3 or 4.8. |
| 6. |
Using your comprehensive Backup and Recovery solution, make a new backup of the affected Mac's now-restored or rebuilt startup disk. |
Using disk utilities to correct hard drive problems
Before using either Disk Utility or a third-party utility to correct directory corruption or address bad sectors, consider the following precautions and take action as appropriate:
- Only use disk utilities that are compatible with the version of Mac OS X you are using.
- Verify that you have the latest version of the disk utility, particularly third-party disk utilities. Using outdated, obsolete, or incompatible versions of any disk utility can make a bad problem worse.
- Thoroughly read and understand the documentation of the disk utility you plan to use.
- If time and circumstances permit, you may want to try to recover the data on the affected disk or volume to avoid the possibility — albeit remote — that attempts to correct a disk problem could fail or exacerbate the potential for data loss. See our "Data Recovery" FAQ.
Prevention
- To minimize the potential of data loss, implement a comprehensive Backup and Recovery solution and use it regularly, preferably backing up everything daily.
- Repair Disk Permissions after installing any third-party software that employs its own installer.
- Implement the advice in the chapter "Protecting Against Power Problems" of our book Troubleshooting Mac OS X.
- Learn and use the keyboard shortcuts for Restart and Shutdown discussed in the AppleCare Knowledge Base document "Mac OS: Apple Pro Keyboard Shortcuts for Shut Down and Restart." Use these keyboard shortcuts instead of pulling the power cord or battery if you are unable to Restart or Shut Down your Mac via the Apple menu.
- Occasionally check your hard drives, particularly your Mac OS X startup disk, using the Repair Disk process as part of your Mac OS X maintenance routine.
Related links
|
|
|
|